Customize an activity to have multiple transitions
If you want to create different paths a workflow can take based on how the Activity is completed, you can update an existing Activity to allow multiple transitions. This functionality lets you refine the options on the Next Workflow Task screen based on how the previous assignment was completed.
 Required permissions
You must have permission to the Projects Module to work with projects and workflows.
 However, keep in mind that administrators and other users can set permissions on components and folders.
- You must have permission to edit the workflow template component.
- You must have folder permissions where the template is stored.
- For details on how to check and set permissions, refer to: Set permissions.
 For a complete list of permissions, including starting a workflow from a template, read: Workflow permissions.

 Tips and tricks
- Activities are exclusive to the template they are in. If you want to add a new activity to multiple workflow templates, you must open each template and add the activity separately.
- If you want to create a copy of an existing activity, you can also Copy and paste an activity.
- You also can manage activities in the following ways:
- If you want to automate the next step after an Activity is completed, you can add an Action to apply to a Transition. These actions must be preconfigured before you can select them on the Update Transition screen.
- InspireCreateReview. Follow the steps in: Add a Create Review Action to a topic workflow template.
- InspireCreateApproval. Follow the steps in: Add a Create Approval Action to a topic workflow template.
- InspireApprove. Follow the steps in: Add an Inspire Approve Action to a topic workflow template.
- InspireUnapprove. Follow the steps: Automate unapprovals in a workflow.
- InspireCreateTranslation. Follow the steps in: Automate translation in a workflow template.
- InspirePublish. Follow the steps in: Automate publication in a workflow template.
- InspireCompletenessReport. Follow the steps in: Automate completeness reporting in a workflow template.
- InspireTranslationCompletenessReport. Follow the steps in: Automate translation completeness reporting in a workflow template.
 Before you begin
- The changes to an Activity will be applied to all new workflows that are started using this template.
- If you are updating an Activity where an assignment is given to multiple users or will contain multiple tasks, read: Understand how multiple transitions are evaluated in an active workflow.
- For workflows that use this template and are in progress:
- If the Activity you are updating has not occurred yet, the changes will be applied when the workflow moves to the updated Activity.
- If the Activity you are updating has already been completed, the changes will not be applied.
To update an activity to allow multiple transitions:
1. Update the activity
 Tips and tricks
- You can only create multiple transitions for one activity if it has the Create Multiple Transitions option selected.
- To learn more about this functionality, read: Using multiple transitions with one activity.
- If you are creating an Activity that will be assigned to multiple users or will contain multiple tasks, read: Understand how multiple transitions are evaluated in an active workflow.
To update an activity and allow multiple transitions:
-
Click
 Components.
-
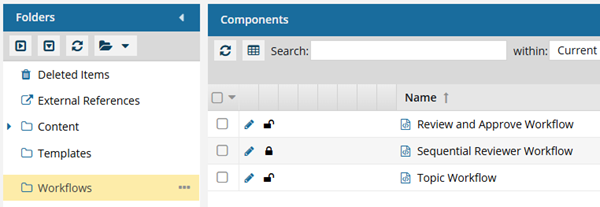
In the Folders pane, select Workflows.
 If you have moved the template to another folder, go to that location instead.
 -
In the Components pane, select a workflow.
To open the template, do one of the following:
- Double-click the file
- Right-click the file, and then select Edit...
- Click
 the Options menu, and then select Edit...
 Results: You see the workflow activities and transitions in the editor.
 -
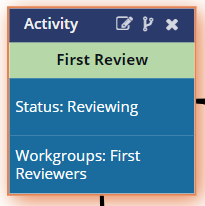
In the workflow editor, select the Activity you want to update.
Result: The box you select is highlighted in orange.
-
In the Activity's title bar, click
 Edit.
Results: You see the Update Activity screen.
Edit.
Results: You see the Update Activity screen.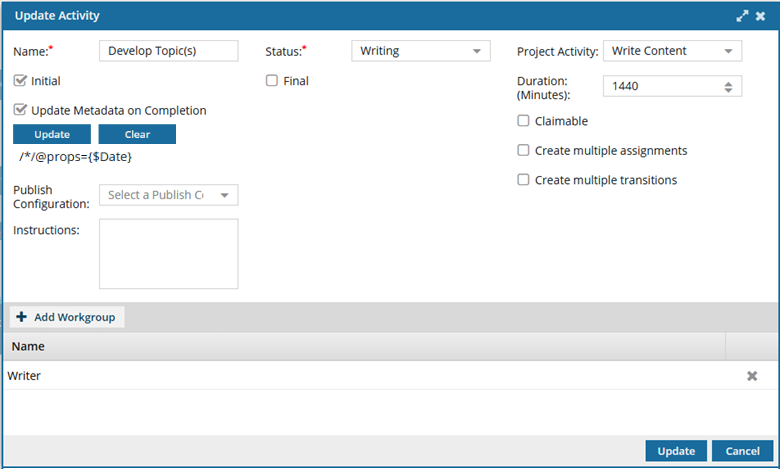
-
Select Create Multiple Transitions.
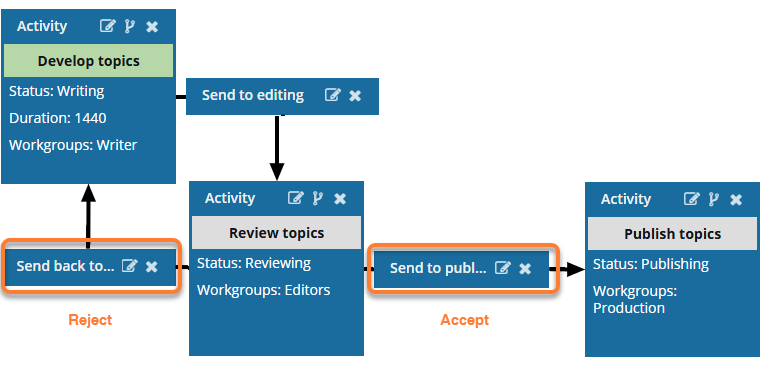
Results: When you add a transition From this Activity, the Create Transition screen includes an option to select a Transition Type. You can create one transition for each type listed. Currently, this is limited to Accept and Reject.
- This functionality lets you create different paths for the workflow to follow.
- For example, you can configure a review activity that lets the user select Accept or Reject when completing the activity. If they select Accept, the workflow can advance to an approval or translation task. If they select Reject, the workflow can return to the develop content task.
- For help creating multiple transitions, follow the steps in: Using multiple transitions with one activity.
-
To save your Activity changes, click Update.
If you do not have all the required fields configured, the Update button is unavailable. Make sure you have entered or selected a value for all the following fields:
- Name
- Status
- Project Activity
- Workgroup
Results: - You can see your updated activity in the workflow editor.
-
To save your template changes, do one of the following:
- If you are done updating the workflow, to close the workflow editor, click
 Save and Submit.
 - If you want to keep working but save your changes locally, click
 Save Progress.
Results: - The changes to an Activity will be applied to all new workflows that are started using this template.
- For workflows that use this template and are in progress:
- If the Activity you are updating has not occurred yet, the changes will be applied when the workflow moves to the updated Activity.
- If the Activity you are updating has already been completed, the changes will not be applied.
- If you are done updating the workflow, to close the workflow editor, click
2. Connect the Accept transitions
After you update an activity so that it supports multiple transitions, you can add more transitions for the Accept Transition Type in various ways:
- Create new transitions for the Activity. Follow the steps in: Create the Accept transitions.
- Move an existing transition to the updated Activity. Follow the steps in: Update transitions in a template.
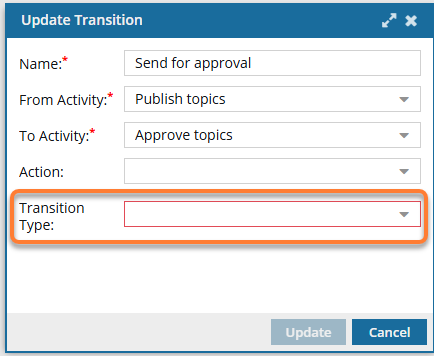
If you have any transitions that were connected to the Activity before you selected the Create Multiple Transitions option, you must edit them to select a Transition Type. Otherwise, you will see an error when trying to create an active workflow based on this template.
3. Optionally, connect the Reject transitions
Tips and tricks
- You do not have to create any transitions with a Transition Type of Reject if you don't need them.
- If you don't create any, in an active workflow, the user who completes the Activity's task can choose which Accept transition will advance the workflow.
- If you do create them, and an Activity includes multiple assignments:
- If a user is completing the last assignment, the Next Task screen is displayed, and the user can decide how to advance the workflow.
If all assignments have a State of Completed-Accepted, the Next Task screen shows all transitions that are configured with a Transition Type of Accept.
- If all assignments have a State of Completed-Rejected, the Next Task screen shows all transitions that are configured with a Transition Type of Reject.
- If the assignments have a mix of States (both Completed-Accepted and Completed-Rejected), the Next Task screen shows all transitions you configured (both Accept and Reject Types).
- If a user is completing the last assignment, the Next Task screen is displayed, and the user can decide how to advance the workflow.
- For more information on Transition Types, read: Using multiple transitions with one activity
To connect the Reject transitions, do any of the following:
- Create new transitions for the Activity. Follow the steps in: Create the Reject transitions.
- Move an existing transition to the updated Activity. Follow the steps in: Update transitions in a template.
If you have any transitions that were connected to the Activity before you selected the Create Multiple Transitions option, you must edit them to select a Transition Type. Otherwise, you will see an error when trying to create an active workflow based on this template.