Update Activities and Transitions for a topic workflow template
Inspire provides you with a template for the process of developing content. If you want a workflow that contains a different tasks,the tasks in a different order, different transitions between activities or a workflow that assigns work to different workgroups, you can update the workflow template. The template is used to create a workflow to guide users through the process you want to use.
 You must have permission to work with workflow templates.
- By default, only users with the following permissions can create project workflows and assignments:
- Administrator permissions
- Access to the Project Module with the Create permission
- Even if you don't have these permissions, you can be granted a special permission to create workflows and project assignments after a project is created.
- If you are an administrator, refer to Allow users to create project assignments and workflows.

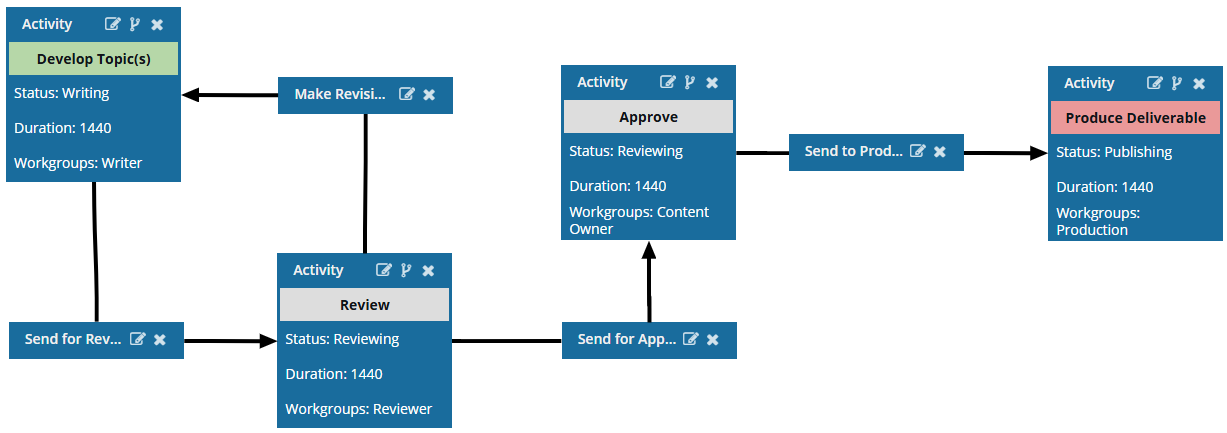
Inspire provides a Topic template to automate the tasks you need to create, review, and publish content. You can customize the template in a workflow editor (not Oxygen) to fit your business processes.
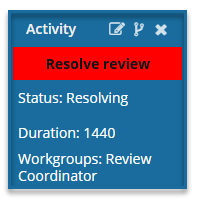
In the workflow editor, you specify the Activity that needs to be done, such as writing content, getting a review, or publishing a deliverable.

![]()
 You use transitions to identify what should happen when a workflow Activity is completed. This is especially important if something needs to be done before the next Activity can begin.
- For example, after a technical review, you can create a transition with a Name that specifies the files should go to an editor for review.
- If there is also an Action that needs to be done, such as Take a snapshot, you can select from a list of Actions that have been created for this template.
 Tips and tricks
- If you want a workflow that contains more options when configuring activities and their transitions, follow the steps in: Update the building blocks for a topic workflow template.
 Before you begin
- Create Inspire transition Actions. You can configure a workflow template to include actions that Inspire runs automatically. These actions must be pre-configured before you can select them on the Update Transition screen.
- InspireCreateReview. When a user advances a project workflow Activity and the next Transition has an Action of InspireCreateReview, Inspire opens the Create Review screen for the current user. Any known information is pre-populated for the user. To create this action, follow the steps in: Add a Create Review Action to a topic workflow template.
- InspireCreateApproval. When a user advances a project workflow Activity and the next Transition has an Action of InspireCreateApproval, Inspire sends an email notification to each workgroup user assigned to the workflow activity that triggered the Transition. To create this action, follow the steps in: Add a Create Approval Action to a topic workflow template.
- InspireApprove. When a user advances a project workflow Activity and the next Transition has an Action of InspireApprove, Inspire automatically approves the source components associated with the workflow activity that triggered the Transition. This approval does not include component references and takes place without any user intervention. To create this action, follow the steps in: Add an Inspire Approve Action to a topic workflow template.
Manage your custom actions. You can create your own actions that Inspire does not perform but that tells the workflow user what to do next, such as hire a copy editor. Manage custom actions in the following ways:
 Actions are unique to a template. If you want to use a new or updated Action in another template, you have to re-create it in that specific template.
To update activities and transitions in a topic workflow template:
-
Click
 Components.
-
Optionally, to enlarge the display size of the template in the workflow editor, go to the top toolbar and do any of the following:

- To enlarge the display, click
 Zoom In.
 - To reduce the display, click
 Zoom Out.
 - To return to the default display size, click
 Zoom Default.
If your screen is minimized, you can find these options under the  More menu.
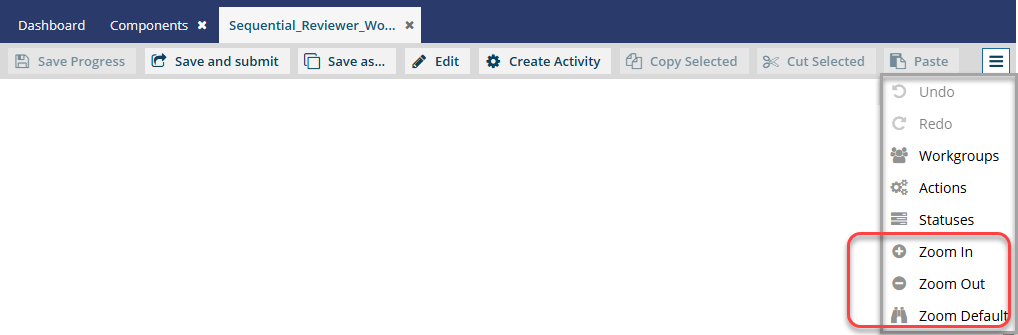
- To enlarge the display, click
-
To update the options you can select for an Activity:
-
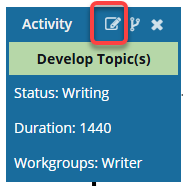
In the activity's title bar, select
 Edit.
Edit.
 Results: The Update Activity screen opens.
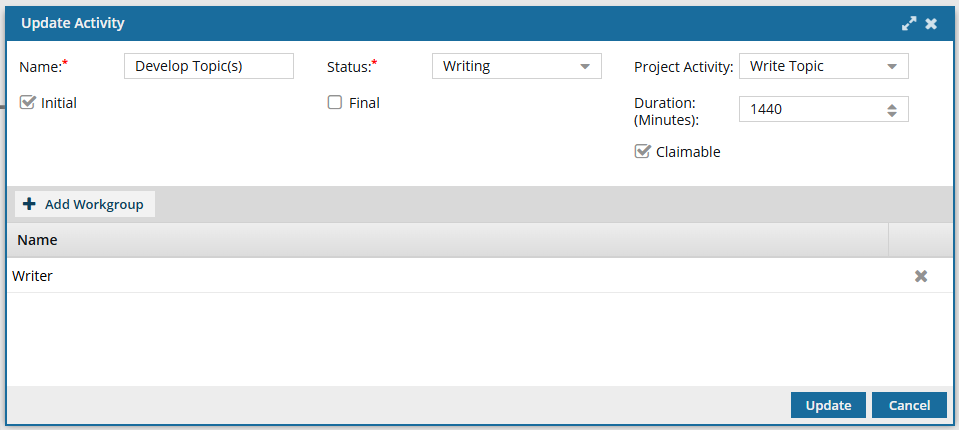
-
In Project Activity, you must associate the workflow activity with a category that defines the work.
- By default, Inspire includes the following categories for Project Activity: Approve Content, Edit Content, Publish Content, Review Content, Review Image, and Write Content.
- Project Activity is a required field and cannot be left blank. Although this field is not marked with a red asterisks, and you can create a new Activity without selecting a Project Activity, if you leave it blank, the Save and Submit options are not available until you correct the errors in the workflow template.
- If there is an error in the configuration of the Activity, you see the Activity name in red.
You must correct any errors before you can Save or Submit the workflow template.
- If there is an error in the configuration of the Activity, you see the Activity name in red.
- If you want to customize this list, follow the steps in: Manage project activity configurations.
-
Optionally, you can set a Duration for this activity in minutes.
Important notes:
- In the templates Inspire provides, by default the user is given a Duration of 0 minutes to complete the activity, so you will need to set your own duration.
- You set the time in minutes from 0 to 525600 which is 1 year.
- After the Duration passes, if the activity is not complete, it is marked as Overdue and notifications may be sent depending on a user's notification preferences.
-
Optionally, in Claimable, you can identify this activity as a project assignment that isn't assigned to one person initially. Instead the user creating the workflow provides a list of users who can accept the assignment.
If you set an Activity to Claimable, when a user creates a workflow using this template:
- The user who creates project assignment selects the Claimable options, then Inspire sets the activity to a State of Ready To Claim.
- The user who creates workflow can select from the list of participants who can possibly accept the work. This user list is taken from the workflow's workgroup assigned to this type of activity.
- After the assignment is created, all participants are sent a notification that there is an assignment to claim.
- The first user who changes State to In Progress claims the assignment and can complete the work.
-
In the activity's title bar, select
-
To update the options you can select in a Transition:
-
In the transition's title bar, select Edit.
 Results: The Update Transition screen opens.
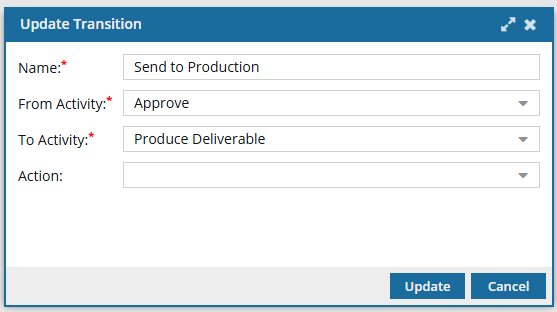
-
In Action, select a process that needs to be completed after the previous Activity and before the next one starts. Select from one of the following types:
You can only select Actions that have been created for this template. If an action that you need is missing, follow the steps in Create an action in a template.
- A fully manual process. This can be a process that is completed in or out side of Inspire, such as Hire a copy editor or Take a snapshot.
- A process that Inspire starts for you.
- Reviews. Inspire opens a Create Review screen for you and pre-populate any known information. You must complete the remaining required fields and click Create.
- Approvals. Inspire sends a notification to each workgroup user assigned to the previous workflow Activity to ask if component references should be included in the approval.
- A process that Inspire completes without any user interaction.
- Approvals. Inspire approves all source components. This approval does not include component references and takes place without any user intervention.
-
In the transition's title bar, select
-
To revert a change, in the toolbar, click
 Undo.
Undo.
-
To re-apply a change in the toolbar, click
 Redo.
Redo.
-
To save your changes, do one of the following:
- To keep the workflow editor open and save your work locally, click
 Save Progress.
 - To close the workflow editor and save your work to the database, click
 Save and Submit.
Results:- Any changes to an Activity are applied to all new workflows that are started using this template.
- Any changes to a Transition are applied to all new workflows that are started using this template.
- For workflows that use this template and are in progress:
- If the Activity you are updating has not occurred yet, the changes will be applied when the workflows moves to the updated Activity.
- If the Activity you are updating has already been completed, the changes will not be applied.
- To keep the workflow editor open and save your work locally, click