Add the Inspire approve action to a transition
To automate the approval process, you can add an Action called InspireApprove to a transition in a workflow template. This Action tells Inspire to automatically approve source components without approving any referenced components and any user intervention.
 Required permissions
You must have permission to the Projects Module to work with projects and workflows.
 Keep in mind that administrators and other users can set permissions on components and folders.
- You must have permission to edit the workflow template component.
- You must have folder permissions where the template is stored.
- For details on how to check and set permissions, refer to: Set permissions
 For a complete list of permissions, including starting a workflow from a template, read: Workflow permissions.

 Tips and tricks
- An Action is unique to the template it's included in. If you want to use the new or updated Action in a different template, you have to re-create it in that specific template.
- The InspireApprove automated Action is helpful because you can get all the components from the previous Activity approved without user intervention.
- If you want the workflow to advance and let reviewers (or users in the previous Activity's Workgroup) select referenced components to include in the Approval process, you can use the Inspire Approve Action (InspireApprove) instead. Follow the steps in: Add a Create Approval Action to a topic workflow template.
 Before you begin
- You must have already created the InspireApprove action. Follow the steps in: Add the Inspire approve action.
- This automated Action is only available in a topic workflow template (not a sequential reviewer template), or a completely new workflow template component.
- A component cannot be included in the approval process if the ApprovalNotRequired tag has been attached to the component. For more details, read Exclude a file from approval using a tag.
To add the Inspire Approve action to a transition, do one of the following:
Add the action to a new transition
Before you begin
- You must have created two Activities to connect. Follow the steps in: Add a new activity to a workflow template.
To add the Inspire Approve action to a new Transition:
-
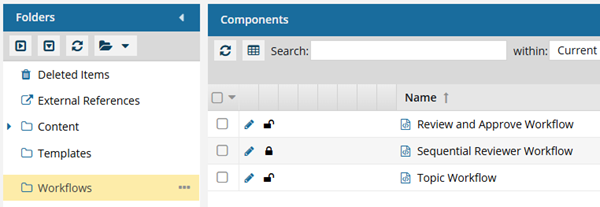
Click
 Components.
-
In the Folders pane, select Workflows.
 You can save a workflow template to another folder. If you did this, open that folder instead of the Workflows folder.
 -
In the Components pane, select a workflow.
The InspireApprove action is only available in Topic workflows or a completely new workflow template component.
-
In the first Activity that you want to connect through a transition, go to the toolbar and select
 Create transition.
-
On the Create Transition screen, In Name, enter Send for approval or another similar title.
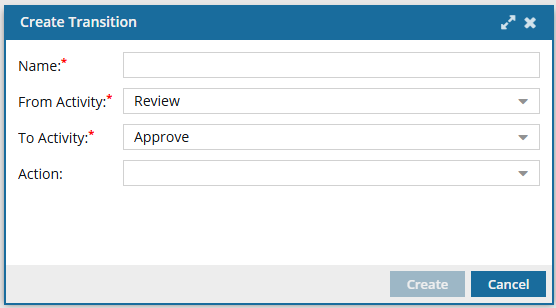
-
In Action, select the InspireApprove option.
If you don't see the option you need, Cancel out of this update and follow the steps in: Add the Inspire approve action.
-
To save your changes, click Create.
 Results:
- You can see your new transition with two lines: one line connecting it from the start activity; one line connecting it to the end activity.
- To move your transition in the editor but not change the start and ending activities, click the transition's title bar, and when you see the move cursor, drag it inside the editor.

The lines connecting the transition to the start end activities are re-drawn as you move the box.
Update an existing transition
-
Click Components.
-
In the Folders pane, select Workflows.
You can save a workflow template to another folder. If you did this, open that folder instead of the Workflows folder.
-
In the Components pane, select a workflow.
The InspireApprove action is only available in Topic workflows or a completely new workflow template component.
-
Select the transition you want to update, and it it's title bar and select
 Update transition.
-
On the Update Transition screen, in Action, select the InspireApprove option.
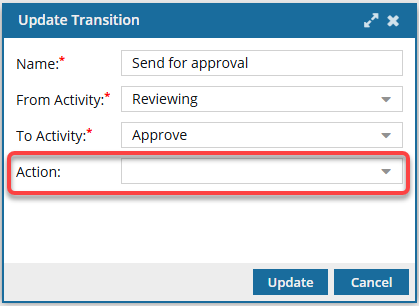 If you don't see the option you need, Cancel out of this update and follow the steps in: Add the Inspire approve action.
 -
To save your changes, click Update.
Results:
- Your transition changes are saved.
- The changes are applied to all new workflows that are started using this template.
- For workflows that use this template and are in progress:
- If the Transition you are updating has not occurred yet, the changes will be applied when the workflow moves to the updated transition.
- If the Transition you are updating has already been completed, the changes will not be applied.