Restart a completed workflow
Inspire makes it easy to re-use a workflow again after it's been completed. To use the Restart option you need to be working in a project on the Workflows panel. Using the Restart option sets the workflow State back to Executing and creates the initial project assignment.
 Required permissions
To create, view, update, and delete workflows you must either be an Administrator, the project Owner, or have the following permissions:
- Create, read, update, and delete permissions to the
 Projects module.
 - For the Projects module, your user account must be listed under the following Property: can_initiate_assignment.
- If you are an administrator, refer to Allow users to create project assignments and workflows.

 Tips and tricks
Restart vs. Resume. Workflows provide a rich set of management options. Two options that are available may seem similar because they both set the workflow State back to Executing. However, these two options differ in the following ways:
- Resume. When a workflow is active and has a State of Executing, it can be Paused. To start working where you left off when the workflow was Paused, you can use the Resume option to change the State from Paused back to Executing.
- Restart. When a workflow is done and has a State of Completed, you can start the workflow over again from the very first task.
- You cannot restart a project workflow from the
 Workflows module. You must restart a workflow in the project's Workflows panel.
To restart a completed workflow:
-
Click Projects.
-
On the Project Management tab, all projects in your organization are listed. To find a specific project, you can:
- Filter the list of available projects by words in the project name. In the Search text box, enter a keyword, and then click the magnifying glass
 .
. - Filter the list of available projects to include only those you own or are participating in. In Type, select an option to filter the list by that criteria.
- To include completed projects in the list, select Include Completed and then click the magnifying glass .
- Filter the list of available projects by words in the project name. In the Search text box, enter a keyword, and then click the magnifying glass
-
To open the project with the completed workflow, select the project and double-click it.
Note: You can also open a project by:
- Right-clicking the project and then selecting Open.
- Clicking
 the Options menu and then selecting Open.
-
In the Workflow pane, select the completed workflow you want to restart from the initial task.
 The workflow must have a State of Completed.
 -
In the workflow's row, click the Options menu and select Restart.
-
On the Restart Workflow screen:
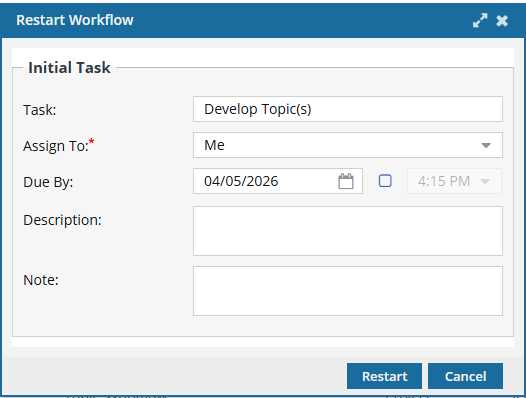
-
For the first Task, select an activity. In the default Topic workflow template provided by Inspire, this is the Develop Topic(s) activity.
A Task can be configured as claimable.
- If it is, after Task, you see that label (Claimable).
- If a Task is Claimable, the user you select in Assign To is notified to start the work. However, all other users in the Assign To list receive a notification and can become the assignee if they claim the work before the user you select.
-
If the template you selected includes Duration times for the selected Activity (Task), that time is used as the default value in Due By. You can do one of the following:
- Add more time by extending the due date out
- Add a new due date if there is no default
- Leave this value blank
Optionally, you can set a time for the deadline. After selecting the date, select the checkbox that follows it and then select a time from the list.
-
Optionally, you can enter a Note to the user to include additional guidelines such as what needs to be completed before the task is done.
After you create a workflow, you see more tracking details by reading the notes users leave when completing a task. For more details, read Understand workflow notes and statuses
-
For the first Task, select an activity. In the default Topic workflow template provided by Inspire, this is the Develop Topic(s) activity.
-
Click Restart.
 Results:
- The workflow State changes from Completed to Executing.
The workflow is created, and you can see an assignment in the Assignments pane.
All participants you added to the workflow can be viewed in the Participants pane.
 If you try to assign work to a participant who doesn't have access to the component, you will see the following error.
 This workflow has one or more permission problems. It is recommended to cancel the workflow, correct the permissions, and then restart it. The assigned user "Jane.Doe@MyCompany.com" does not have permission to access the following components: PrivateConcept.
- The error tells you the name of a user included in the workflow. It may not be user who needs the permissions, so you have to check each participant's permissions to the restricted component.
- The warning tells you the name of the restricted component.
- The Workflow is still started. You can change the permission, participant, or the component to resolve the conflict.
- For details on how to set permissions, refer to: Set permissions.