Start a topic workflow
Users with permissions can easily start a workflow for a review assignment from a project and assign workflow activities to participants that are included in the review.
 Required permissions
To create, view, update, and delete workflows you must either be an Administrator, the project Owner, or have the following permissions:
- A Seat Type of Standard. If the user has a Seat Type of ReviewOnly or Support, they cannot be given permissions to start a workflow. Administrators can see a user's seat type in the
 Security module on the User Management tab. Refer to the topic: Things you do on the User Management tab.
 - Create, read, update, and delete permissions to the
 Projects module.
 - For the Projects module, your user account must be listed under the following Property: can_initiate_assignment.
- If you are an administrator, refer to Allow users to create project assignments and workflows.
 Tips and tricks
When you create a review workflow from a project, the project must include at least one user with review coordinator permissions.
Make sure you meet the following requirements when creating a workflow:
- The project includes a user with permissions to create a review.
- Optionally, when adding participants to a project, you can select the Role of Review Coordinators. This list includes all users in your organization that can create a review.
- For more details about adding participants to a project, read Get started with projects.
 Keep in mind that after you add a participant to a project and give them tasks to complete, you might not be able to easily remove them. You can't remove a participant from an active project if they are:
- A reviewer, approver, or coordinator of an active Review workflow in that project.
- A reviewer or coordinator of a Topic workflow in that project.
- Given an assignment in that project.
For more details, read Remove participants from a project.

To start a topic workflow:
-
In the Workflow pane, click Add Workflow
 .
.
-
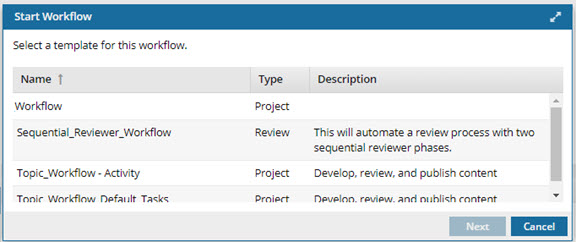
To create a topic development process, on the Start Workflow screen, select Topic Workflow or another custom topic workflow, and then click Next.
-
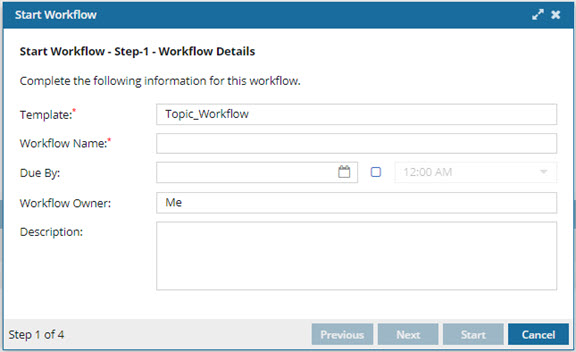
On the Start Workflow (Step 1 of 4) screen:
-
Optionally, you can set a deadline. In Due By, either enter a date or click
 the Date picker and select a date.
 If the template you selected includes Duration times for any of the activities, all times are added up and used as the default value in Due By. You can add more time to extend the due date, add a new due date if there is no default, or leave this value blank.
-
Optionally, you can set a deadline. In Due By, either enter a date or click
-
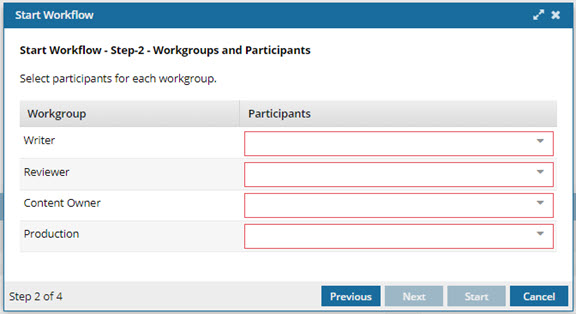
On the Start Workflow (2 of 4) Workgroups and Participants screen:
-
By default, all users in a workgroup are added as Participants. To remove a user, unselect them using the dropdown menu.
 Keep in mind that you will not be able to remove a participant from a Topic workflow after the workflow has been started. You will have to cancel the entire workflow and start over.
-
By default, all users in a workgroup are added as Participants. To remove a user, unselect them using the dropdown menu.
-
On the Start Workflow (3 of 4) Activities screen:

-
Click Next.
Note that you can set default Activities for a workflow in the Topic workflow template.
- If there are no defaults, you must select a Project Activity.
- If there are defaults, you can choose to leave them and click Next.
- If there are defaults, you can choose to change them if necessary.
- For instructions on setting Project Activity defaults, refer to:
-
Click Next.
-
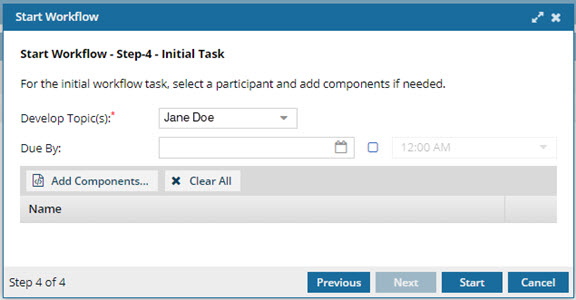
On the Start Workflow (Step 4 of 4) Initial Task screen:
-
Optionally, to add the due date for the first task, use the Due By calendar to choose a date.
If the template you selected includes a Duration time for the first activity, that time is used as the default value in Due By. You can add more time to extend the due date, add a new due date if there is no default, or leave this value blank.
-
Optionally, to add components, click Add Components, select the folder, and then the component. When you've added the ones you need, click Select.
Inspire checks to see if the component(s) you want to add are in another assignment, project workflow or review workflow.
- You see warnings if a component is already in use.
- If you want, you can close the warnings and create the assignment or workflow anyway.
-
On the Initial Task screen, click Start.
If you try to assign work to a participant who doesn't have access to the component, you will see an error.
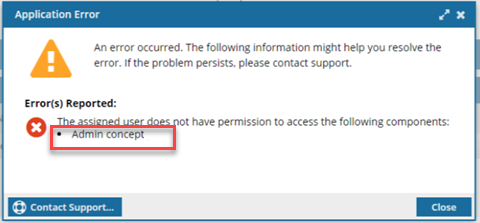
- The error tells you the name of the restricted component.
- The Workflow is still started. You can change the participant or the component to resolve the conflict.
- For details on how to set permissions, refer to: Set permissions.
 Results: Your workflow is created and you can see an assignment in the Assignments pane. All participants you added to the workflow can be viewed in the Participants pane.
-
Optionally, to add the due date for the first task, use the Due By calendar to choose a date.