Manage workflow template activities
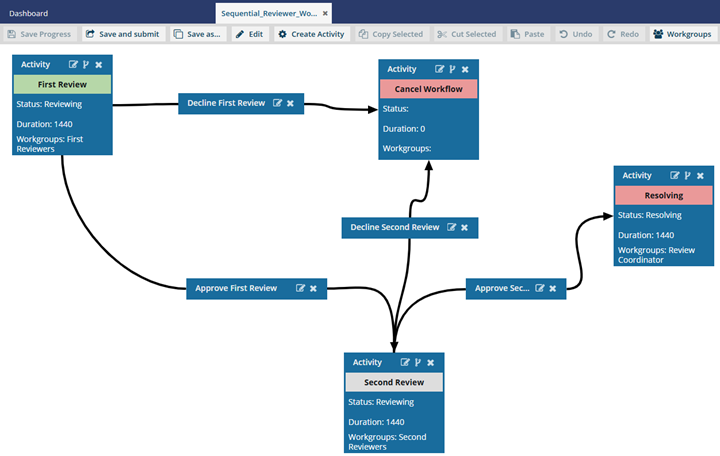
Inspire provides you with a template for the process of getting reviews on content from two users. If you want a workflow that contains different activities, such as Write, Edit, Approve, Publish, or a custom option, you can update the template. You can also change the order activities or just update the existing activities in the default workflow.
 You must have permission to work with workflow templates.
- By default, only users with the following permissions can create project workflows and assignments:
- Administrator permissions
- Access to the Project Module with the Create permission
- Even if you don't have these permissions, you can be granted a special permission to create workflows and project assignments after a project is created.
- If you are an administrator, refer to Allow users to create project assignments and workflows.

What do you want to do?
- Add a new activity
- Copy and paste an activity
- Update an activity
- Move an activity
- Delete an activity
 If you want to add an activity to automate the process of creating a review in a Topic workflow, follow the steps in Add a Create Review Action to a topic workflow template.
Add a new activity
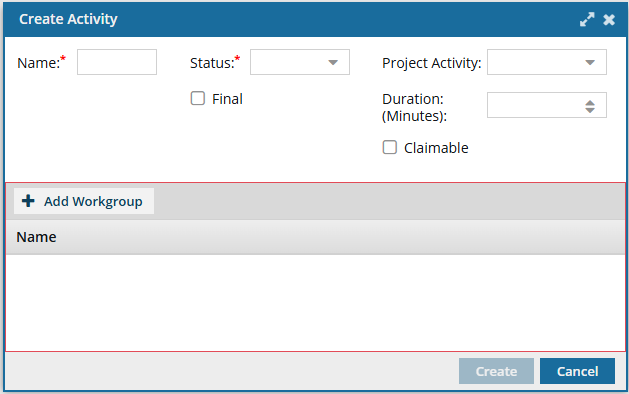
To add a new activity:
-
Click
 Components.
-
In the workflow editor, click
 Create Activity.
-
In Workgroup, select
 Add Workgroup.
- Select an option such as First Reviewer, Second Reviewer, or Review Coordinator.
- Click Update.
-
Optionally, on the Create Activity screen, to set a default value, you can select a Project Activity such as Write, Edit, Approve, Publish.
If you don't select a default, the user who starts the workflow will be required to select a Project Activity.
-
Optionally, you can set a Duration for this activity in minutes.
Important notes:
- In the templates Inspire provides, by default the user is given a Duration of 0 minutes to complete the activity, so you will need to set your own duration.
- You set the time in minutes from 0 to 525600 which is 1 year.
- After the Duration passes, if the activity is not complete, it is marked as Overdue and notifications may be sent depending on a user's notification preferences.
-
Optionally, in Claimable, you can identify this activity as a project assignment that isn't assigned to one person initially. Instead the user creating the workflow provides a list of users who can accept the assignment.
If you set an Activity to Claimable, when a user creates a workflow using this template:
- The user who creates project assignment select the Claimable options, then Inspire sets the activity to a State of Ready To Claim.
- The user who creates workflow can select from the list of participants who can possibly accept the work. This user list is taken from the workflow's workgroup assigned to this type of activity.
- After the assignment is created, all participants are sent a notification that there is an assignment to claim.
- The first user who changes State to In Progress claims the assignment and can complete the work.
-
To save your changes, click Create.
 Results:
- You can see your new activity as the first box in the workflow editor.
- Your new activity may be covering up the First Activity. To move it, click the Activity title bar, and when you see the move cursor, drag it to where you want it to occur in the workflow.

- You may need to create a transition between other activities and your new one. Follow the steps in Manage workflow transitions in a template.
You can now:- If you are done updating the workflow, to close the workflow editor, click
 Save and Submit.
 - If you want to keep working but save your changes locally, click
 Save Progress.
 - If you want to make other changes to a review workflow, continue to Update the review workflow template.
- If you want to make other changes to a topic workflow, continue to Update the topic workflow template.
Copy and paste an activity
To copy and paste an activity:
-
Click Components.
-
In the workflow editor, select a box in the workflow that is titled Activity.
Result: The box you select has an orange highlight around it.

-
In the workflow editor toolbar, click
 Paste.
-
Click the Activity title bar, and when you see the move cursor, drag it to where you want it to occur in the workflow.
-
To save or continue working:
- If you are done updating the workflow, to close the workflow editor, click Save and Submit.
- If you want to keep working but save your changes locally, click Save Progress.
- If you want to make other changes to a review workflow, continue to Update the review workflow template.
- If you want to make other changes to a topic workflow, continue to Update the topic workflow template.
- If you are done updating the workflow, to close the workflow editor, click
Update an activity
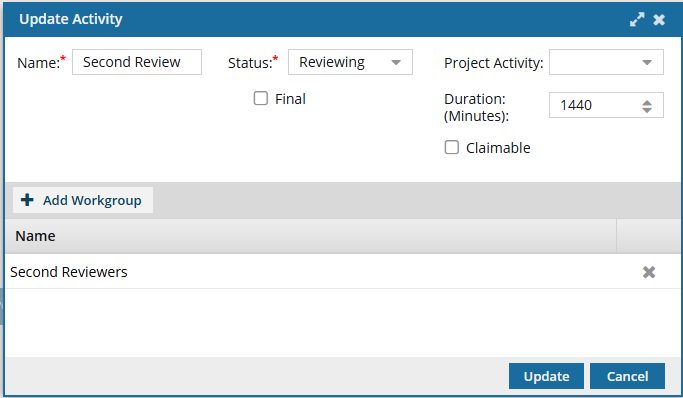
To update an existing activity:
-
Click Components.
-
In the workflow editor, select a box in the workflow that is titled Activity.
Result: The box you select has an orange highlight around it.
-
In the Activity title bar, click
 Edit.
Edit.
-
In Workgroup, select Add Workgroup.
- Select an option such as First Reviewer, Second Reviewer, or Review Coordinator.
- Click Update.
-
Optionally, on the Create Activity screen, to set a default value, you can select a Project Activity such as Write, Edit, Approve, Publish.
 If you don't select a default, the user who starts the workflow will be required to select a Project Activity.
 -
Optionally, you can set a Duration for this activity in minutes.
Important notes:
- In the templates Inspire provides, by default, the user is given a Duration of 0 minutes to complete the activity, so you will need to set your own duration.
- You can set the time in minutes from 0 to 525600 which is 1 year.
- After the Duration passes, if the activity is not complete, it is marked as Overdue and notifications may be sent depending on a user's notification preferences.
-
Optionally, in Claimable, you can identify this activity as a project assignment that isn't assigned to one person initially. Instead, the user creating the workflow provides a list of users who can accept the assignment.
If you set an Activity to Claimable, when a user creates a workflow using this template:
- The user who creates project assignment select the Claimable options, then Inspire sets the activity to a State of Ready To Claim.
- The user who creates workflow can select from the list of participants who can possibly accept the work. This user list is taken from the workflow's workgroup assigned to this type of activity.
- After the assignment is created, all participants are sent a notification that there is an assignment to claim.
- The first user who changes State to In Progress claims the assignment and can complete the work.
-
To save your changes, click Create.
Result: You can see your updated activity in the workflow editor.You can now:
- If you are done updating the workflow, to close the workflow editor, click Save and Submit.
- If you want to keep working but save your changes locally, click Save Progress.
- If you want to make other changes to a review workflow, continue to Update the review workflow template.
- If you want to make other changes to a topic workflow, continue to Update the topic workflow template.
- If you are done updating the workflow, to close the workflow editor, click
Move an activity
To move an existing activity:
-
Click Components.
-
In the workflow editor, select a box in the workflow that is titled Activity.
Result: The box you select has an orange highlight around it.
-
To move using drag and drop:
-
Click the Activity title bar, and when you see the move cursor, drag it to where you want it to occur in the workflow.
-
Click the Activity title bar, and when you see the move cursor, drag it to where you want it to occur in the workflow.
-
To move using cut and paste:
-
In the workflow editor toolbar, click
 Cut Selected.
-
In the workflow editor toolbar, click Paste.
-
Click the Activity title bar, and when you see the move cursor, drag it to where you want it to occur in the workflow.
-
You will need to create or update transitions between other activities and the one you moved.
 Follow the steps in Manage workflow transitions in a template.
-
In the workflow editor toolbar, click
-
To save or continue working:
- If you are done updating the workflow, to close the workflow editor, click Save and Submit.
- If you want to keep working but save your changes locally, click Save Progress.
- If you want to make other changes to a review workflow, continue to Update the review workflow template.
- If you want to make other changes to a topic workflow, continue to Update the topic workflow template.
- If you are done updating the workflow, to close the workflow editor, click
Delete an existing activity
-
Click Components.
-
In the workflow editor, select a box in the workflow that is titled Activity.
Result: The box you select has an orange highlight around it.
-
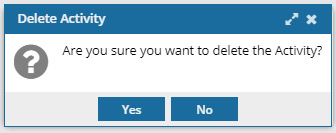
Click the Activity title bar, and then click
 Delete.
-
On the confirmation screen, click Yes.
-
You will need to create or update any broken transitions between other activities and the one you deleted.
Follow the steps in Manage workflow transitions in a template.
-
To save or continue working:
- If you are done updating the workflow, to close the workflow editor, click Save and Submit.
- If you want to keep working but save your changes locally, click Save Progress.
- If you want to make other changes to a review workflow, continue to Update the review workflow template.
- If you want to make other changes to a topic workflow, continue to Update the topic workflow template.
- If you are done updating the workflow, to close the workflow editor, click