Update a topic workflow
Users with permissions can easily update workflow due dates after the workflow starts.
 Required permissions
To create, view, update, and delete workflows you must either be an Administrator, the project Owner, or have the following permissions:
- Create, read, update, and delete permissions to the
 Projects module.
 - For the Projects module, your user account must be listed under the following Property: can_initiate_assignment.
- If you are an administrator, refer to Allow users to create project assignments and workflows.

 Tips and tricks
- You can only update the following details of an active topic workflow:
- Workflow Name
 Important notes:
- Renaming a workflow does not cancel, restart, or otherwise interrupt the workflow.
- Existing task progress, task history, and workflow state remain unchanged when the workflow name is updated.
- Due By
- Workflow Name
- You cannot update the following details of a topic workflow:
- Workflow Owner
 To change this detail, you must cancel the entire workflow and re-create it.
- Workflow Owner
- The steps to update a review workflow are different. Follow the steps in: Update a review workflow.
To update a topic workflow:
-
In the Workflow pane, select the workflow you want to update, select
 the Options menu, and then select Update.
-
On the Project Workflow screen:
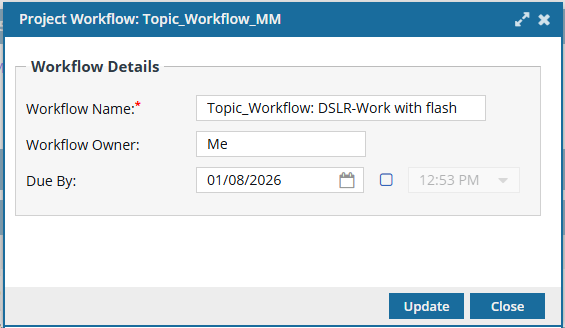 You cannot update the Workflow Owner.
- In Workflow Name, edit the existing text.
-
In Due By, either enter a date or click
 the Date picker and select a date.
- Optionally, to set a time, select the checkbox, then select a time from the dropdown list.
-
Click Update.
 Results: Changes are saved successfully and are reflected consistently throughout the application wherever the Workflow Name and Due by date are displayed. Already existing history records will not be updated and will show the workflow name before the update.