Save a list of translation jobs as a CSV file
After a vendor completes the translation work, or you've canceled a job, you may want to remove the job from the list on the Translations Management tab to keep the list short. For reporting purposes, you can also export a list of translation jobs to a comma-separated values (CSV) file after they have been completed or canceled.
 Required Permissions
 For full access to all translation jobs, you must be an administrator.
- An admin can edit and cancel any translation job regardless of Translation module permissions.
- To configure permissions, administrators can follow the steps in: Update module access permissions.
- For full access to your own jobs, you must be a coordinator.
- Coordinators retain access to their own jobs regardless of Translation module permissions.
- A user who is the coordinator of a job can still edit and cancel it even if they have no explicit Translation module-level Update permission.
- To edit and cancel any translation job, a non-admin user must have both the Read and Update permissions for the Translation module.
- To see all jobs, a non-admin user must have the Read permission for the Translation module.
 Tips and tricks
- Inspire creates the plain-text CSV file that lists all the same columns that are on the Translations Management tab when you select the Save as CSV option.
- You can use the CSV file to export data from Inspire and import the data into another application where you can edit or store the data for more complex reporting.

To save a list of translation jobs as a CSV file:
-
From the top menu, select
 Translations.
-
On the Translations Management tab, in the list, select the checkbox for the translation(s) you want to export.
 If you can't find the job you're looking for, do any of the following:
- If there are multiple pages, scroll to the next page using the controls at the bottom of the list.
- Sort the list by clicking a column heading.
- Search for items in the list that contain a keyword or phrase.
- Limit the list to show only jobs in a specific state. Go to States and select an option.
- Show hidden jobs by selecting the checkbox for Include Archived, Include Completed, or Include Cancelled
-
In the Translations list, above the column heading, click
 Save as CSV.
-
To choose what time zone is used, on the Convert time confirmation screen, select one of the following:
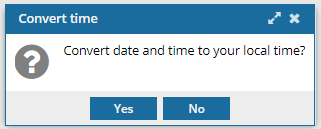 You see the date displayed in the header of the CSV as: All date/times are shown in {timezone} or UTC.
UTC is a time zone standard used as a basis for all time zones worldwide. It is a constant timescale and does not change for Daylight Saving Time.
- To use your local time, click Yes.
- To use UTC time, click No.
Result: A download starts automatically.