View a publish activity report for multiple components
You can gather metrics about who has published a map or component. The report tells you how often it was published, how long it took to create the deliverables, and if it was successful or had issues. You can select multiple components and then go to the Selected Component pane to request the reports. This lets you create a separate publishing report for each component all at the same time.
 Tips and tricks
- The report only contains publishing events that occur on or after March 13, 2025.
- You receive a separate notification and report for each component you select.
- You can also create a Publish Activity Report in a project.
 Create a publish activity report for one project component Create a publish activity report for multiple project components
 - You can also create a Publish Activity Report for one component in the Components browser.

To view a publish activity report for multiple components:
-
Click
 Components.
-
On the Selected Components pane, select
 Reports, and then select Publish activity report.
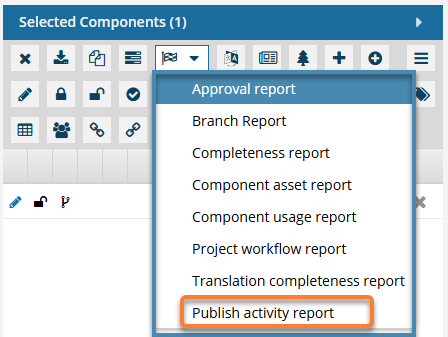
 If you select a component that isn't a map, the Publish Activity option is not available.
 -
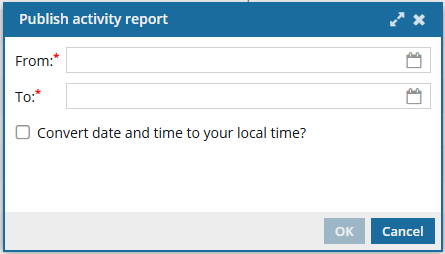
On the Publish activity report screen:
-
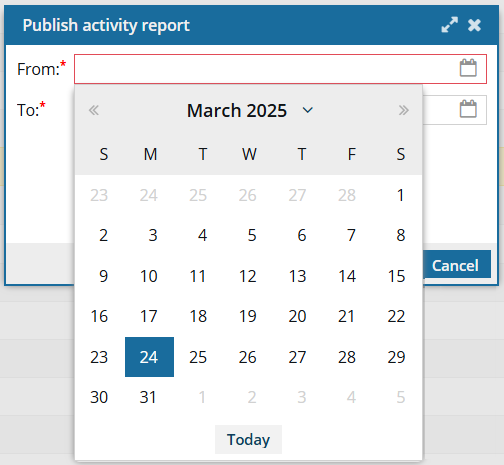
In From, either enter a starting date as MM/DD/YYYY, or click
 the Calendar icon to pick a date.
Important:
the Calendar icon to pick a date.
Important:- The date must either be on or before the current day highlighted in blue.
- Each report created for each selected map will all use this same From date.
-
In To, either enter a date as MM/DD/YYYY, or click the Calendar icon to pick a date.
Important:
- The date must either be on or after the date selected in From.
- Each report created for each selected map will all use this same To date.
-
By default, the Convert date and time to your local time? option is not selected and the report displays all dates and times based on the Time Zone that your Inspire server instance is located in.
 If you want to see all dates and times based on the Time Zone specified in your Profile, select the Convert date and time to your local time? option. (To view or change your Time Zone, follow the steps in: Select your time zone.)
 -
Click OK.
 Results: You see a notification for each report that is being generated.
 You see another set of notifications when the reports have been created.
-
In From, either enter a starting date as MM/DD/YYYY, or click
-
From the top menu, select
 Notifications.
-
Select one of the notifications that contains the report.
The Subject line says:
 Publish Activity Report.
 -
To see the report, click the download link provided in the notification.
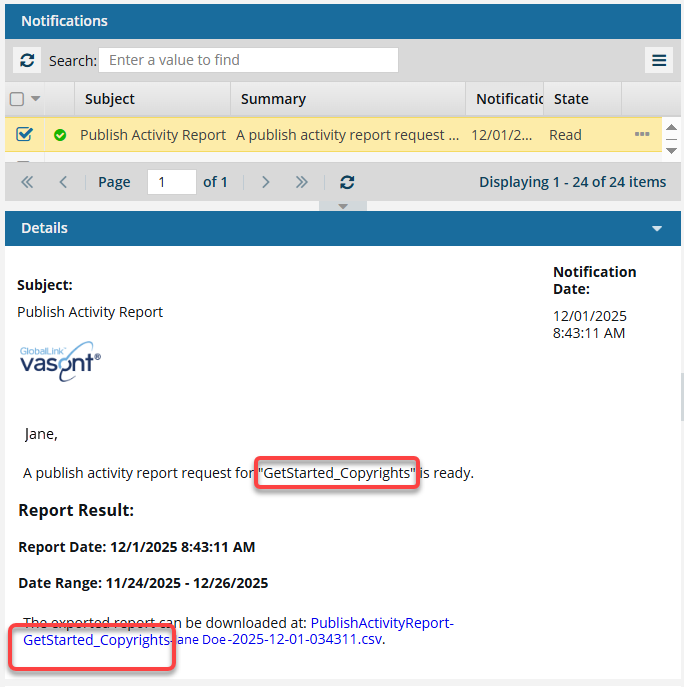 Important notes:
- There is no preview of the report in the notification you receive.
- When you run a report on multiple components, Inspire creates a separate report for each component.
- Inspire adds the component name to the report's CSV file name.
- If the component hasn't been published before, a report is still generated but it contains only the report dates and column headings and no data.
-
On your local computer, open the report to see the details.
Results:
Inspire provides a usage report in a comma-separated value (CSV) file that gives you information about the publishing history for the component you selected.

You can see details about the report before the table of data, including:- Report Date: Displays the day and time when a user requested the report.
- Date Range: Displays the start and end date for the report. No times are shown in this range as the entire day is included by default.
The report contains a table with the following columns:
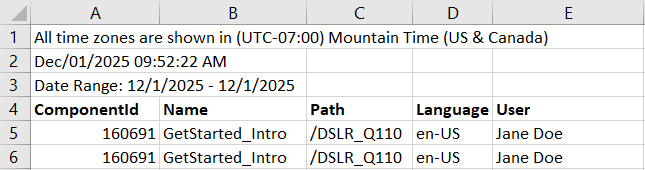
- ComponentId.A string of numbers generated by Inspire for internal use.
- Name. The name as it is displayed in the Components browser.
- Path. The list of folders you must open before you find the component.
- Language. The source language that the component uses. This code is a language code followed by a region code.
- User. The name of the user who submitted the publishing request.
- PublishDate. The date the publishing request was submitted.
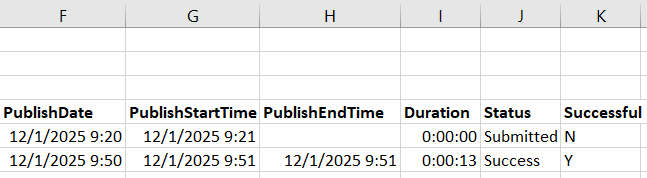
- PublishStartTime. The date and time when Inspire began to collect the publishing events for the selected component during the selected time range. If this column is empty then the publishing job did not complete successfully.
- PublishEndTime. The date and time when Inspire finished collecting the publishing events for the selected component during the selected time range. If this column is empty then the publishing job did not complete successfully.
- Duration. The number of hours, minutes, and seconds it took Inspire to create the report after the process started (HH:MM:SS). This number does not include any duration of time that occurred between when the request was submitted and when Inspire began to create the report. If this number is 00:00:00 then the publishing job did not complete successfully.
- Status. Displays the last processed that was completed.
- If the value is Submitted, then the job has been queued but not completed.
- If the value is Success, then the job completed successfully.
- If the value is Queued, then the job encountered an error after it left the queue. No published artifact was created. If the component is included in a translation job that's in progress and the report is generated just after the translated job is queued, then the status in this report is also set to Queued. In this case, the report didn't encounter an error. The component is just in the translation queue before submission.
- If the value is Failure, then the job encountered an error before it could complete and no published artifact was created.
- Successful. Indicates if the job completes and a published artifact was created.
- If the value is Y (Yes), then the map was submitted, queued, processed, and a published artifact created.
- If the value is N (No), then the map was submitted but an error occurred before a published artifact could be created.
The report only contains publishing events that occur on or after March 13, 2025. - The Publishing activity report feature was not available before the release of Inspire 2025.1.2.0 and any publishing events before those dates aren't included in the report.
- To see a publishing history before the March 2025 version, open the component Details and select the History tab.