Create a component branch
You can create a component branch from an existing component and add the branch to a specific component folder. You can choose if the branch maintains all, some, or no content referenced in the source component. If a source component has a long list of references, you can bypass the wait time for the display to load and quickly create a branch. For source components with a shorter list of references, you can display the list of references and customize which specific components are branched.

Quickly create a branch
 You may not see all referenced components on the Save as a branch screen.
- Components that are referenced in the source component are only listed if:
- You select the Show referenced components option
- It doesn't have a tag applied to it called ExcludeFromBranch. For more details, read Prevent branched references.
To quickly create a branch:
-
From the top menu, click
 Components.
-
Right-click the row, select Save, and then select Save as a branch.
 You can also click
  the Options menu, select Save, and then select Save as a branch.
 -
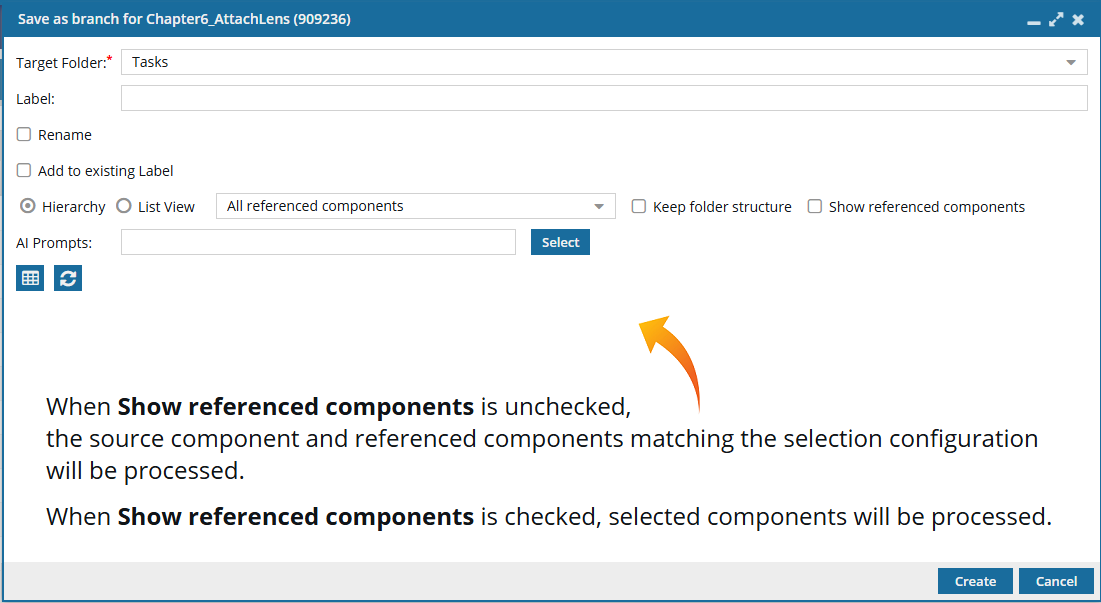
On the Save as a branch screen, do not select Show referenced components. This allows you to automatically save all references without having to wait to see them.
-
On the Save as branch screen, choose where to save the copies:

-
If you want to create copies of all selected components (source and reference) in the Target Folder, do not select the Keep folder structure option.
For example:
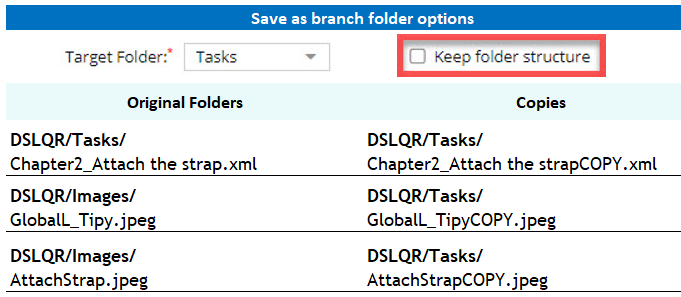
 In this example, all copies can be found in the Tasks folder.
 -
If you want to create the copies of all selected components (source and reference) in their current folders, select the Keep folder structure option.
For example:
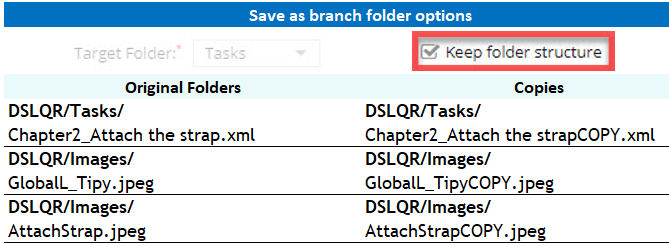 After you select the Keep folder structure option, the Target Folder option is greyed out and becomes unavailable. If you want to select a different Target Folder, do it before you select Keep folder structure or clear the Keep folder structure option and choose a different Target Folder. In this example, the copies are found in different folders according to where the original was stored. If you selected a different Target Folder and the Keep folder structure option, Inspire creates the copies in the same folder structure as they had, but under the Target Folder you just selected. If the folders do not exist, Inspire creates them.
For example:
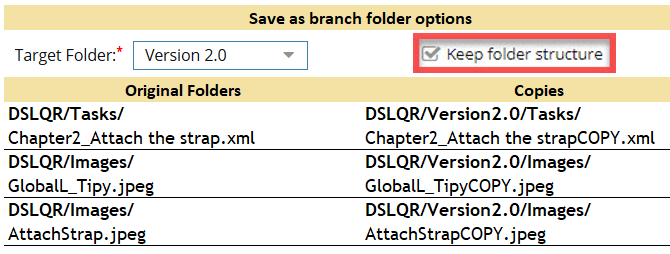 In this example, the copies are found in different folders according to where the original was stored, but under the folder Version 2.0.
-
If you want to create copies of all selected components (source and reference) in the Target Folder, do not select the Keep folder structure option.
-
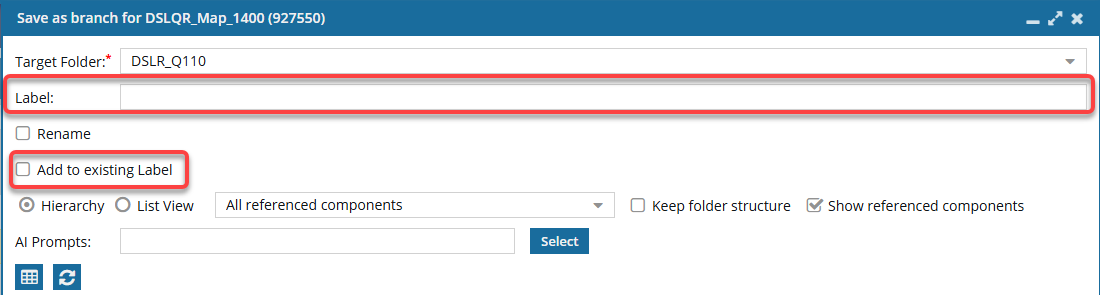
You can either create a new Label for the branch or add the files to an existing branch by selecting Add to existing Label: (You cannot select both options.)
- To create a new Label:
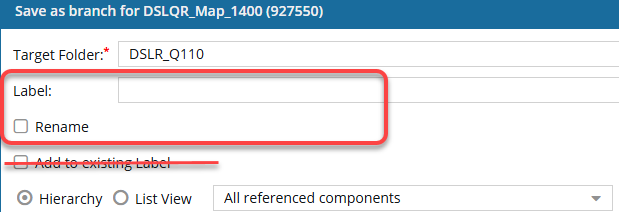
a. In the Label text box, enter a unique suffix to append to the source component's name for the branched copy. This adds a suffix to all branched components with the Label you enter.
The branch name (Label text box) is limited to 50 characters. 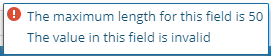
- If you exceed this limit, the text box turns red and an error message pops up when you hover your cursor over the field.
- Long unique numbers are also attached to custom labels, so be sure to keep your label short. For MyLabel__93746df4-558f-4414-9423-52835fa5d2cd.
- The Label you enter appears in Component Details on the Branches tab and the History tab.
Although the Label field is not required, if you don't add a value, the branch process will fail. - This failure happens because without a Label to create a unique Name and File Name, the branch process tries to create a copy of referenced files using the same name as the original.
- To create a new branch name without a Label, use the Rename option on the Save as Branch screen. You can enter a new unique name, and then the branch can be successfully created with an empty branch Label because a unique name will be created.
The Rename checkbox is only available if you enter a new Label. If you select the Add to existing Label instead, the Rename option is becomes unavailable. Do not select the Add to existing Label checkbox if you want to create a new Label.
 - To add to an existing Label:
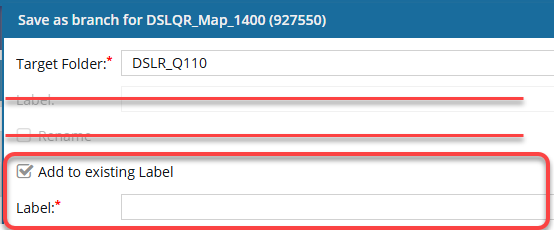
a. Select the Add to existing Label checkbox.
b. In the new Label field, select from an existing label. This adds the files you are currently branching to an existing branch by appending the branch's label.
For example, for the selected topic DSLQR_Map_1400, you select Add to existing Label, and choose Release1. After the branch is created:- The map selected to Save as Branch has the existing label Release1.
- If any files referenced by the map are also branched, they have the existing label Release1 attached after the original name and before any GUIDs.
- The map and referenced files are added to the Release1 branch.
- Name: DSLQR_Map_1400_Release1
- File Name: DSLQR_Map_1400_Release1_{GUID}
If you select Add to existing Label, the Rename checkbox and the Label entry field options are no longer available, since you are adding files to an already existing branch. If you want to use the Rename option, do any of the following:- Clear the Add to existing Label option and create a new branch that can be given a name different from the component.
- After you complete the branch, open the Components browser, find the source of the branch you want to edit, and rename it.
 Rename a component You can also use the Branch Management tool to find the branch you want to rename, and then use the Go to option to find it in the Components browser. Go to a branched component
- To create a new Label:
-
If you did NOT select Add to existing Label, you can optionally Rename the copy of component you selected:
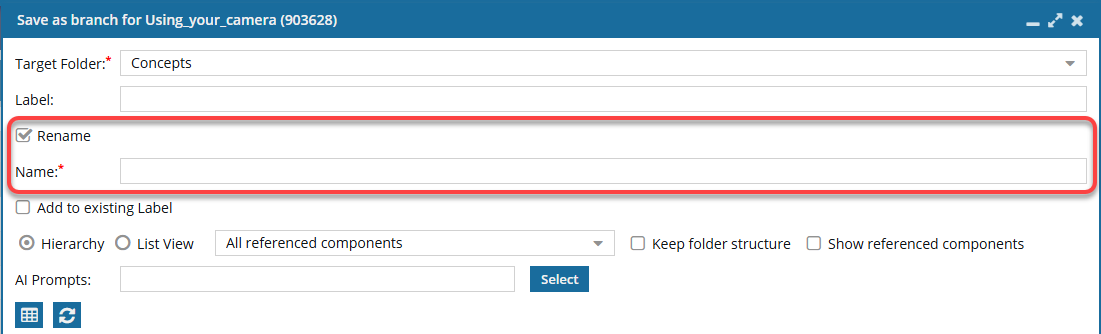
-
After you select Rename, you see a new field for Name. Enter in a new name for the component's copy. For example, you can rename the Using_Your_camera component to Using_Q1300_camera.
You can use a maximum of 1000 characters.
 Results:
- The new component you are creating as a copy will have a filename of {Rename}_{Label}_GUID. For example, Using_Q1300_camera_Label_335f7a77-6859-42d0-bdbe-755bd442a0cd.xml. The new branched component also has a component name of {Rename}_{Label}. For example, Using_Q1300_camera_Label.
- Referenced components will not include the name you enter in Rename. All referenced components keep their name with the Label attached. For example, {Name}_{Label}_GUID. For example, Chapter1_Label_930fcf68-bfdf-435c-b21b-754f25aebdb7.xml.
- The new component you are creating as a copy will have a filename of {Rename}_{Label}_GUID. For example, Using_Q1300_camera_Label_335f7a77-6859-42d0-bdbe-755bd442a0cd.xml.
-
After you select Rename, you see a new field for Name. Enter in a new name for the component's copy. For example, you can rename the Using_Your_camera component to Using_Q1300_camera.
-
Optionally, if you want to save the list of references, above the grid showing referenced components, click
 Save as CSV.
By default:
Save as CSV.
By default: - The components are listed in the CSV in the following order:
- By Sequence ID
- This means you see the components listed in CSV in the same order as in Hierarchical view.
- The CSV file contains the components.
- The components are listed in the CSV in the following order:
-
Click Create.
You see a message that the branch is being created.
If the creation was successful, you see the following message:

You see a message about the branch in the following places:
- Temporary pop-up message in the top right corner of the Inspire screen.
- As a message on the Notifications tab.
- In your email Inbox from Vasont (if configured).
- In Slack (if configured).
If you used a label:
The Label you enter appears in Component Details on the Branches tab and the History tab. The Label can also be known as the Name. - This is because the Label doesn't replace the component name, but allows you to identify why the history record was created.
- When you create a snapshot on demand, the Name becomes the Label but is always shown as Name.
- When you branch a component, you add a title in the Label field. In the History record (of snapshots), the Label is always shown as Name.
- Long unique numbers are also attached to custom labels, so be sure to keep your label short. For MyLabel__93746df4-558f-4414-9423-52835fa5d2cd.
- Later, if you update a snapshot, you can edit the Name (Label) as long as the history record isn't for a Branch action.
- You cannot update the Name (Label) for a snapshot where the Action is Branch.
If you open the Component Details, select the History tab, and choose a record where Action is Branch you cannot select the Update option.
- You can update the Name (Label) for all other types of snapshots
After you click Create, the branched files are created and named using the following format:
- Component name = ComponentName_LabelName
- Filename name = ComponentName_LabelName_GUID.XML
You can see the new component branch files in the Components browser in the target folder.
Inspire creates a snapshot record for:
The source component where the Action is set to Branch.
The copied components that were branched where Action is set to Create, and Process type is set to Branch.
On the Changesets tab you can search for this history record in the Action and Process Type filters by selecting Branch as an option.
In the Components browser, the branched components have an icon corresponding to their place in the branch.
- Black
 is the source component for a branch. When you hover your cursor over the black branch icon, you see a tooltip telling you it has a branch and also how many branches have been created from it. For example, Has 2 branches.
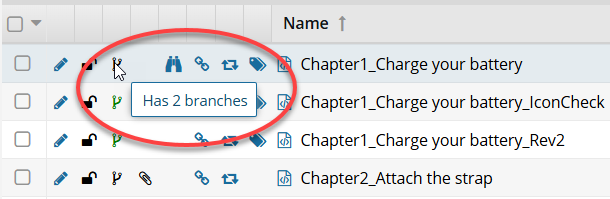
- Green
 was branched because a source component referenced it. When you hover your cursor over the green branch icon, you see a tooltip telling you it is part of a branch. For example, Is a branch.
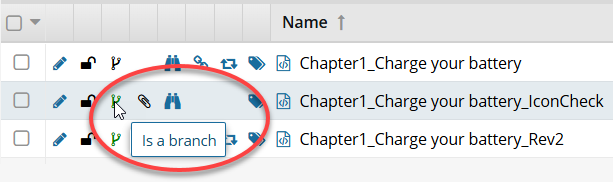
- Orange
 is both the source of one branch and included in another branch because a different source component referenced it When you hover your cursor over the orange branch icon, you see a tooltip telling you it is part of a branch and also how many branches have been created from it. For example, Is a branch and has 1 branch.
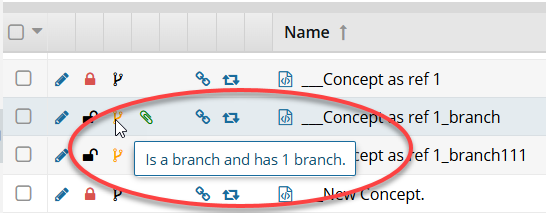
To manage the branch, you can now use the Branch Management tool.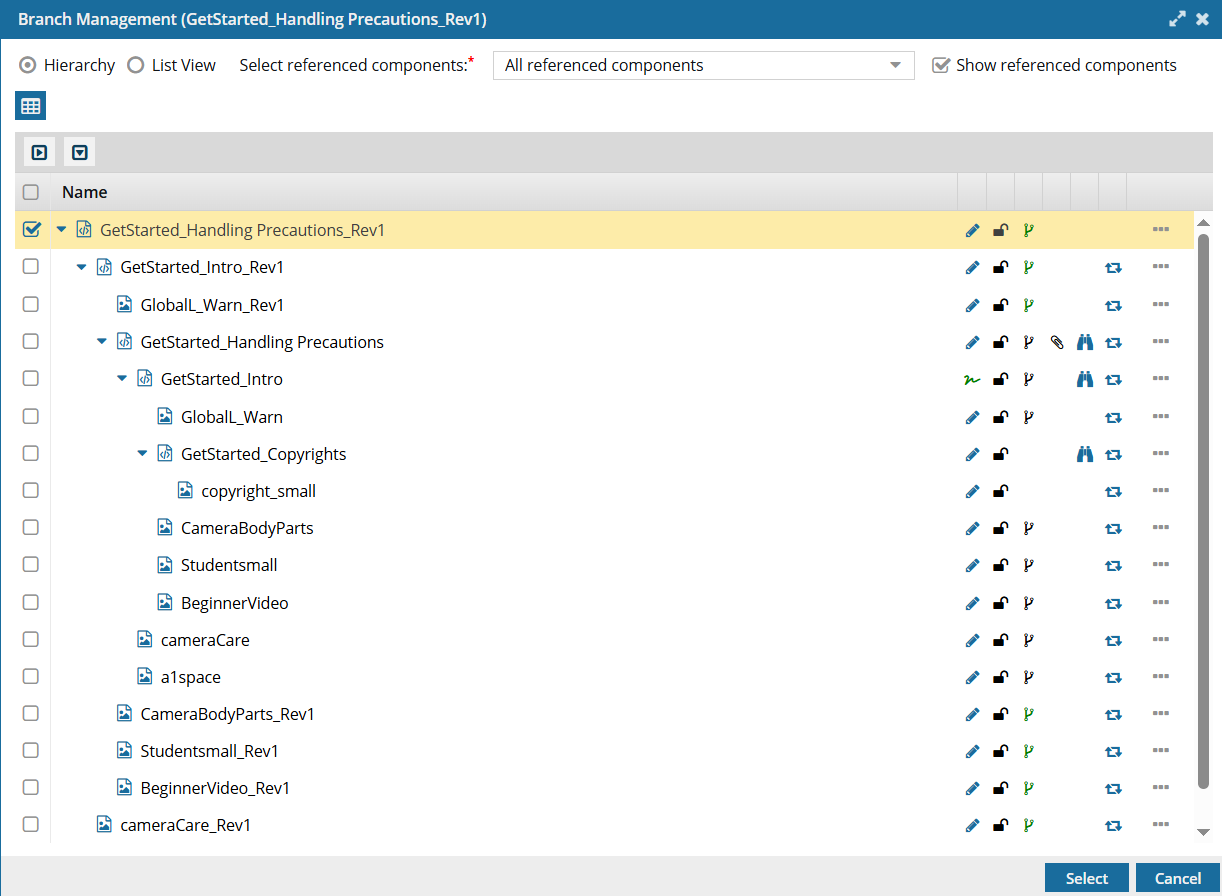
Using the Branch Management tool, you can manage all aspects of a branch, including:
- View: See all related branches
- Edit: Update the branched component
- Go to: See where the branched file is saved
- Relink to Original: Unlink a branched component
 Use the Branch Management tool
If the creation was not successful, you see something similar to the following message:
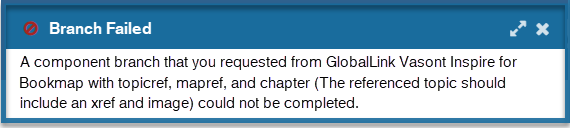
Correct any issues listed in the notification and try again.
Create a customized branch
![]() You may not see all referenced components on the Save as a branch screen.
You may not see all referenced components on the Save as a branch screen.
- Components that are referenced in the source component you are branching are only listed if:
- You select the Show referenced components option
- It doesn't have a tag applied to it called ExcludeFromBranch
For more details, read Prevent branched references.
-
From the top menu, click Components.
-
Right-click the row, select Save, and then select Save as a branch.
You can also click the Options menu, select Save, and then select Save as a branch.
-
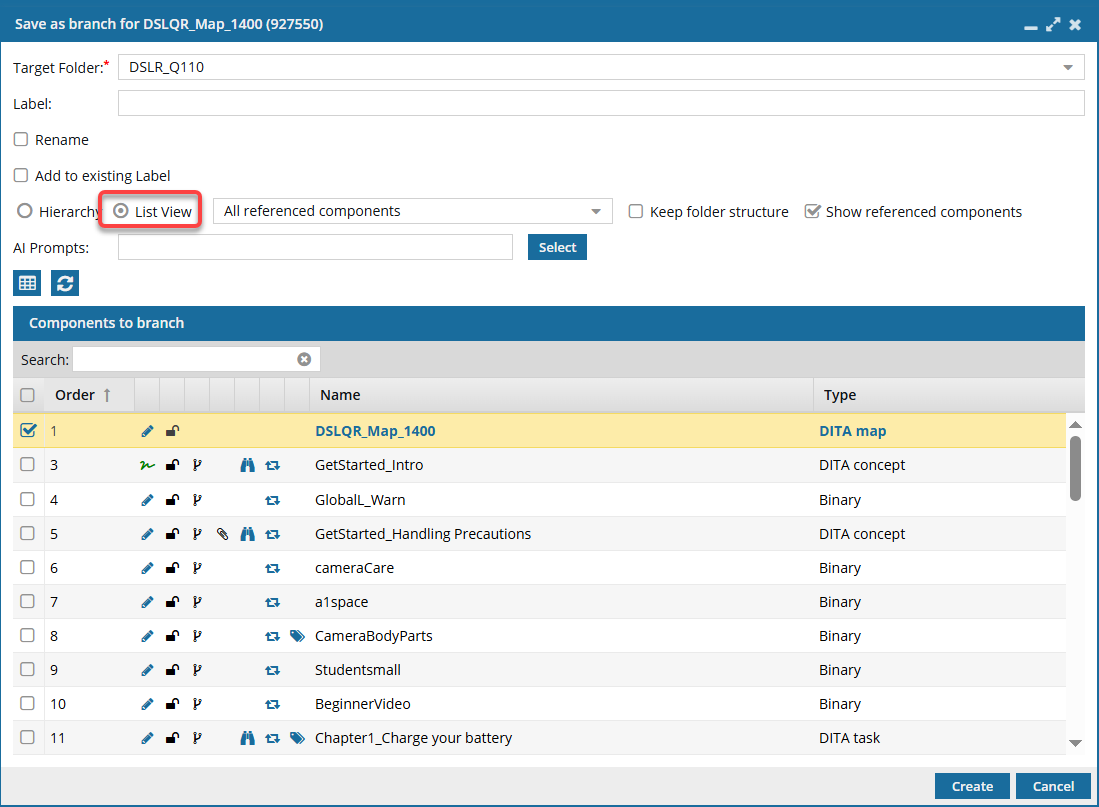
On the Save as a branch screen, select Show referenced components.
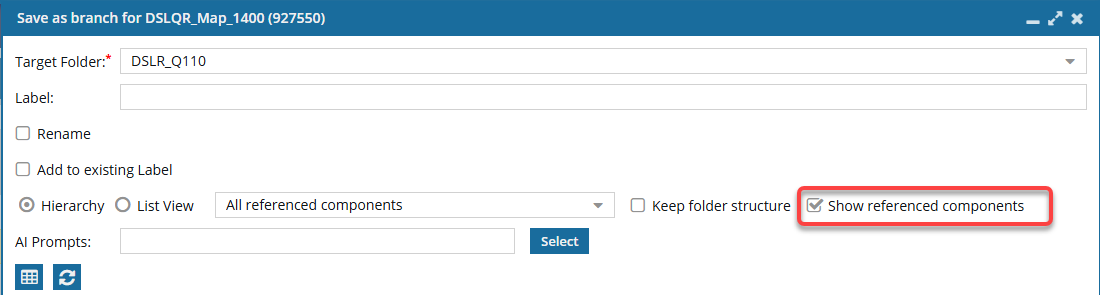 If this is the first time you are selecting Show referenced components for this component, then you are prompted to make a selection:
- Yes—Wait for the list to be built. If you choose to wait, the Save as branch screen stays open while the references are being collected.
a. Look for a notification in the top right corner of your Inspire screen telling you that the list of references for the component has been built.
b. Continue on to Step 9 to select the references you want to keep.
- No—Be notified when the list has been built. If you choose not to wait, the Save as branch screen closes.
a. Look for a notification in the top right corner of your Inspire screen telling you that the list of references for the component has been built.
b. Do one of the following:- Open notification in the Notifications module to go to the component that you were working with
- Select the component again and select Save as branch...
c. Continue on to select the references you want to keep.
If this is not the first time you are selecting Show referenced components for this component:- The list of references has already been built for the component and is saved in Inspire.
- When you choose Save as a branch and select Show referenced components the list appears right away.
- You won't see the prompt again unless you select a component that doesn't have a saved list or if you update the component after the list is saved.
Results: You see the list of referenced components in the Hierarchy view by default.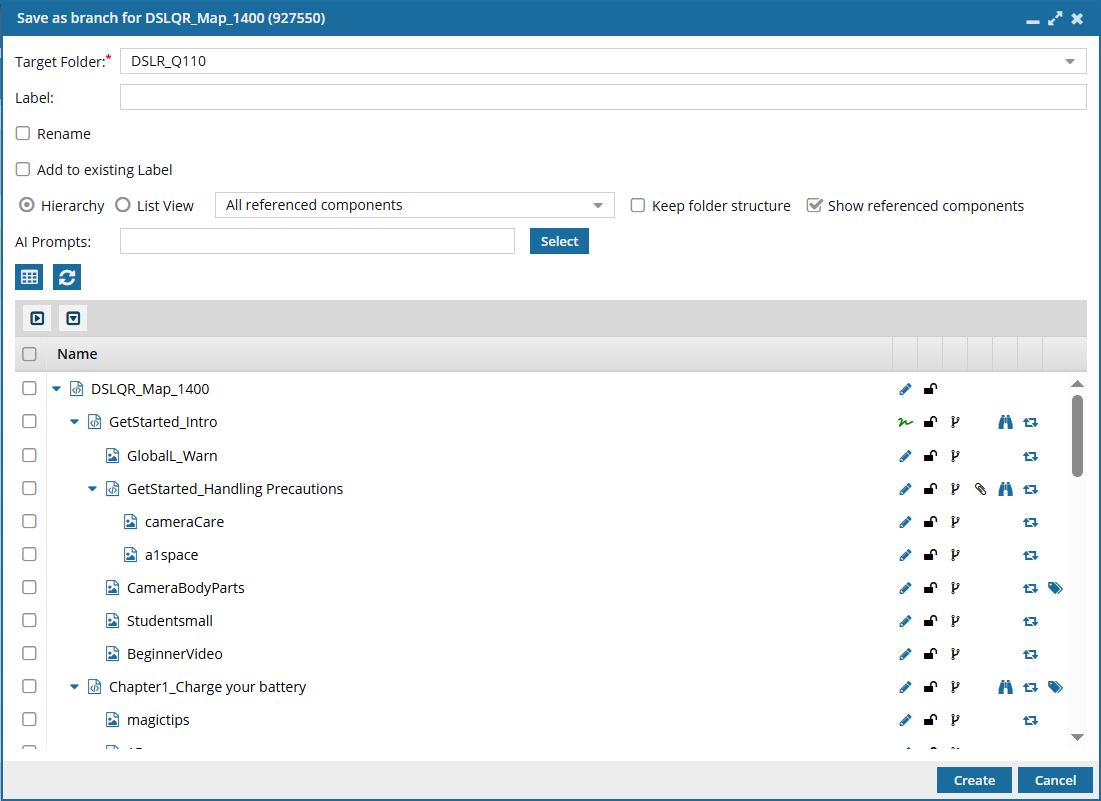
- Yes—Wait for the list to be built. If you choose to wait, the Save as branch screen stays open while the references are being collected.
-
On the Save as branch screen, choose where to save the branched copies:
-
If you want to create copies of all selected components (source and reference) in the Target Folder, do not select the Keep folder structure option.
For example:
In this example, all the branched copies are found in the Target Folder, Tasks. -
If you want to create the copies of all selected components (source and reference) in their current folders, select the Keep folder structure option.
After you select the Keep folder structure option, the Target Folder option is greyed out and becomes unavailable. If you want to select a different Target Folder, do it before you select Keep folder structure or clear the Keep folder structure option and choose a different Target Folder.
For example:
In this example, the branched copies are found in different folders according to where the original was stored. If you selected a different Target Folder and the Keep folder structure option, Inspire creates the branched copies in the same folder structure as they had, but under the Target Folder you just selected. If the folders do not exist, Inspire creates them.For example:
In this example, the copies are found in different folders according to where the original was stored, but under the Target Folder, Version 2.0.
-
If you want to create copies of all selected components (source and reference) in the Target Folder, do not select the Keep folder structure option.
-
You can either add a new Label or add the files to an existing branch by selecting its Label.
- To create a new Label:
a. In the Label text box, enter a unique suffix to append to the source component's name for the branched copy. This adds a suffix to all branched components with the Label you enter.
The branch name (Label text box) is limited to 50 characters. - If you exceed this limit, the text box turns red and an error message pops up when you hover your cursor over the field.
- Long unique numbers are also attached to custom labels, so be sure to keep your label short. For MyLabel__93746df4-558f-4414-9423-52835fa5d2cd.
- The Label you enter appears in Component Details on the Branches tab and the History tab.
Although the Label field is not required, if you don't add a value, the branch process will fail. - This failure happens because without a Label to create a unique Name and File Name, the branch process tries to create a copy of referenced files using the same name as the original.
- To create a new branch name without a Label, use the Rename option on the Save as Branch screen. You can enter a new unique name, and then the branch can be successfully created with an empty branch Label because a unique name will be created.
- To add to an existing Label:

a. Select the Add to existing Label checkbox.
b. In the new Label field, select from an existing label. This adds the files you are currently branching to an existing branch by appending the branch's label.
For example, for the selected topic DSLQR_Map_1400, you select Add to existing Label, and choose Release1. After the branch is created:- The map selected to Save as Branch has the existing label Release1.
- If any files referenced by the map are also branched, they have the existing label Release1 attached after the original name and before any GUIDs.
- The map and referenced files are added to the Release1 branch.
- Name: DSLQR_Map_1400_Release1
- File Name: DSLQR_Map_1400_Release1_{GUID}
If you select Add to existing Label, the Rename checkbox is no longer available, since you are adding files to an already existing branch. If you want to use the Rename option, do any of the following:- Clear the Add to existing Label option and create a new branch that can be given a name different from the component.
- After you complete the branch, open the Components browser, find the source of the branch you want to edit, and rename it. Rename a component You can also use the Branch Management tool to find the branch you want to rename, and then use the Go to option to find it in the Components browser. Go to a branched component
- To create a new Label:
-
If you did NOT select Add to existing Label, you can optionally Rename the branched copy of component you selected.
-
After you select Rename, you see a new field for Name. Enter in a new name for the component's branched copy. For example, you can rename the Using_Your_camera component to Using_Q1300_camera.
You can use a maximum of 1000 characters. Results:
- The new component you are creating as a branched copy will have a filename of {Rename}_{Label}_GUID. For example, Using_Q1300_camera_Label_335f7a77-6859-42d0-bdbe-755bd442a0cd.xml. The new branched component also has a component name of {Rename}_{Label}. For example, Using_Q1300_camera_Label.
- Referenced components will not include the name you enter in Rename. All referenced components keep their name with the Label attached. For example, {Name}_{Label}_GUID. For example, Chapter1_Label_930fcf68-bfdf-435c-b21b-754f25aebdb7.xml.
- The new component you are creating as a branched copy will have a filename of {Rename}_{Label}_GUID. For example, Using_Q1300_camera_Label_335f7a77-6859-42d0-bdbe-755bd442a0cd.xml.
-
After you select Rename, you see a new field for Name. Enter in a new name for the component's branched copy. For example, you can rename the Using_Your_camera component to Using_Q1300_camera.
-
By default, you see references in a hierarchical view.
If you want to work in this view, do any of the following:
-
Only the source component is selected. To branch a component in the list, select its checkbox. To choose all components at once, select the checkbox in the column heading.
You can't clear the checkbox for the source component. If you don't want to branch the source component, click Cancel, find the source component you want to use, and then select Save as a branch again
-
To help you find a reference, use the expand and collapse buttons:
- To expand all parent topics, click

- To collapse all parent topics, click

- To expand one parent topic, click
- To collapse one parent topic

- To expand all parent topics, click
-
Only the source component is selected. To branch a component in the list, select its checkbox. To choose all components at once, select the checkbox in the column heading.
-
If you want to work with references in a list instead of a hierarchy, select List View, and then do any of the following:
-
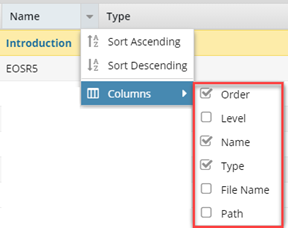
Another way to find a reference is to change which columns are displayed. Place your cursor next to the name of any column and click the down arrow. Select any of the following options:
-
Another way to find a reference is to change which columns are displayed. Place your cursor next to the name of any column and click the down arrow. Select any of the following options:
-
Select the checkbox for each reference you want to branch.
You may not see a referenced component if it has a tag applied to it called ExcludeFromBranch.
-
Click Create.
You see a message that the branch is being created.
If the creation was successful, you see the following message:You see a message about the branch in the following places:
- Temporary pop-up message in the top right corner of the Inspire screen.
- As a message on the Notifications tab.
- In your email Inbox from Vasont (if configured).
- In Slack (if configured).
After you click Create, the branched files are created and named using the following format:
- Component name = ComponentName_LabelName
- Filename name = ComponentName_LabelName_GUID.XML
You can see the new component branch files in the Components browser in the target folder.
Inspire creates a snapshot record for:
The source component where the Action is set to Branch.
The copied components that were branched where Action is set to Create, and Process type is set to Branch.
On the Changesets tab you can search for this history record in the Action and Process Type filters by selecting Branch as an option.
In the Components browser, the branched components have an icon corresponding to their place in the branch.
- Black is the source component for a branch. When you hover your cursor over the black branch icon, you see a tooltip telling you it has a branch and also how many branches have been created from it. For example, Has 2 branches.
- Green was branched because a source component referenced it. When you hover your cursor over the green branch icon, you see a tooltip telling you it is part of a branch. For example, Is a branch.
- Orange is both the source of one branch and included in another branch because a different source component referenced it. When you hover your cursor over the orange branch icon, you see a tooltip telling you it is part of a branch and also how many branches have been created from it. For example, Is a branch and has 1 branch.
To find your copies:- If you did not change the Target folder, your branched copies are now in the same folder as the original component. If you also selected Keep folder structure, the branched copies of all selected components (source and reference) can be found in the same folders as the original instead of the Target Folder.
- If you did change the Target folder, your branched copies are in the selected folder. If you also selected Keep folder structure, the branched copies of all selected components (source and reference) can be found in different folders according to where the original was stored, but under the folder you selected in Target Folder.
 Inspire creates new subfolders if they didn't exist under the Target folder you selected.
If the creation was not successful, you see a message similar to the following:
Correct any issues listed in the notification and try again.